Wednesday, November 26, 2008

Agate and Lace Scarf Pattern

Yoohoo~everybody~! I'm posting something in a million years!
This blog is still alive~yeah!

While I was posting this project on ravelry, I found that the webpage with the "Agate and Lace Scarf Pattern" exists no more! (original link : http://naiveknitting.typepad.com/naive_knitting_blog/2005/03/knit_report_ech.html)

It's a very simple, yet very beautiful scarf pattern.

I made it with 3.75mm needles with 5 repeats of the pattern, and it was about 6" wide. In order to get more lace effect, use larger needles than usually recommended for the yarn size.

You can adjust the needle or the yarn size as you want.


The pattern is as below;

* Abbreviation : sl1, k2tog, psso : slip one, knit 2 together, pass slipped stitch over

CO multiply of 10sts + 3sts

Row1 (WS) : Purl all sts
Row2 (RS) : sl 1, k1, [yo, k3, sl1, k2tog, psso, k3, yo, k1] rep[] to last 1 stitch, k1
Rep these two rows until desired length, then Row1 one more time.
Loosely bind off all sts.
Block and sew the beads at the pointy parts.
Tada~ You have a beautiful lace scarf.

* Please do not post this pattern anywhere else without permission. Thanks.*

Friday, August 17, 2007

TUTORIAL OF CROCHETED COIN PURSE


As seen on Cut Out + Keep

Finally! I’ve fini­shed the tutorial for this purse~!
As I warned earlier, it’s rather a tutorial showing how to make your own pattern than a pattern itself.
I’m not sure if this tutorial makes sense to other people.
I have some experience making knitting patterns, but never made a crochet pattern before.
Anyway, here it goes~!

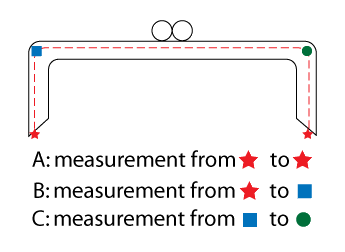
STEP1. Measure the frame you have.


STEP2. Decide how full you want your purse to be. (FYI: mine was the 2nd option)
Draw the outline on a piece of paper and measure the width.


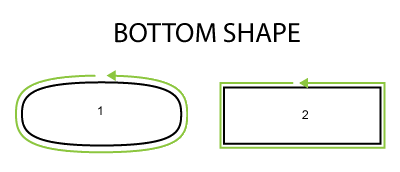
STEP3. Choose a bottom shape. (mine was ellipse.)
Then crochet the bottom part to make the circumference of the bottom to be same as twice of the width from STEP2.
If you don’t know how to crochet an ellipse shape, you can refer to the sole part of this pattern -> http://megan.kiwi.gen.nz/Bootee/instructionsUS.html
(I used SC stitches)


STEP 4. When the bottom reaches the size you need, keep crocheting straight up as below;
ROUND 1: ch2, hdc all around.
ROUND 2:
ch3, 6 dc only through the front loop of the first hdc of previous row, *7dc only through the front loop of the next hdc of previous row* rep from *to* all around the row.
Then, ch2, hdc only through the back loop of the hdc of row 1.
Rep the ROUND 2 until it reaches the height you want.

STEP 5. Crochet to make the top shape decided at STEP 2.
If you chose option1, you can simply add couple more rows of SC.
If you chose option2, crochet front and back side separately, decreasing both edges to make the shape you want.
If you chase option3, crochet front and back side separately, while keeping the edge straight up.

STEP 6. Sew the crocheted purse on the frame if your frame has holes. Otherwise, glue the purse in the ridge of the frame.
Tada~You have a small wriggly purse!


* Please do not post this tutorial anywhere else without permission. Thanks.*

Monday, October 02, 2006

Pattern for "Roses & Leaves"


Update April 6, 2011
Now this pattern is available for download on Ravelry
 
********************************************************************

I finally gave up waiting for Spunmag.com to pay me and update it on the magazine.

Though it's too late for the summer 2006, I hope it's not too late for those who want to make this for the Halloween, or who live in warm climate or the southern half of the globe. :)

SIZE:
(Gauge1) S [L], (Gauge2) M [XL]
FINISHED MEASUREMENT (before stretch)S - B 32in (82cm) / W 28in (71cm)M - B 34.5in (88cm) / W 30.5in (77.5cm)
L - B 37in (93cm) / W 32in (81cm)
XL - B 39.5in (100cm) / W 34.5in (87.6cm)
GAUGEDue to the lace pattern over a multiple of 23 stitches, the gap between one size and another is relatively wide. I came up with suggesting two different gauges to choose from depending on
the size you wish to make. For S or L, please use gauge1, and for M or XL size
use gauge2.
Gauge1 (for S & L size) – 20.5 sts / 31 rows (4”x4”)
Gauge2 (for M & XL size) –19 sts / 29 rows (4”x4”)
MATERIALS
  • Harrisville Silk & Wool Yarns (50% silk/50% fine wool; 50g per skein; 175yd), color #209 Linen; 3 (3, 3, 4) skeins (or any equivalent amount of substituting yarns)
  • 3.25mm (US # 3) circular needle shorter than the waist circumference, and 4 dpns; OR SIZE TO OBTAIN GAUGE
  • 3.75mm (US # 5) circular needle shorter than the bust circumference, or 4 dpns ; OR A NEEDLE OF ONE OR TWO SIZE LARGER THAN THE SMALLER NEEDLE
  • Tapestry needle
  • 21 (21, 24, 24) pearl beads (optional)


ERRATA FOUND! (June 30, 2009)
Abigail LaBranche found an errata among the instructions. (Thanks, Abigail!)

The sentence right below ROUND11 should be "Rep these 5 rounds 2 [3] more times. 145 [164] sts rem." (not 3[4] more times..)
There was a mistake translating the chart in to the instructions.The chart is correct. If you followed the chart only you should be fine. Sorry guys!
The pattern sent out after June 30, 2009 will have corrected instructions.

Wednesday, July 05, 2006

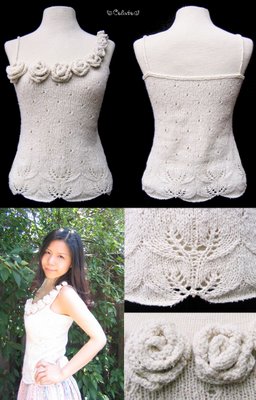
Summer top "Roses & Leaves"


I had this design in mine for a long time and finally knitted it up a few days
ago. I designed it myself and (of course) made the pattern.
I used 2 1/2 skeins of Harrisville "Silk & Wool" yarn, and 3mm, 3.75mm, 4mm
needles.


Sunday, June 25, 2006

I made this long time ago, but I just wanted to post it.


This was "before" and "in-progress" shots.

Wednesday, May 24, 2006

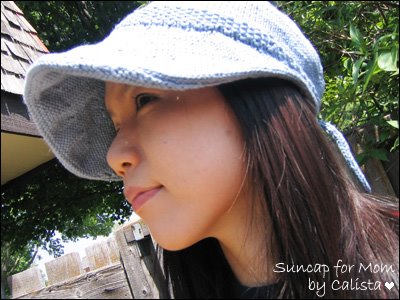
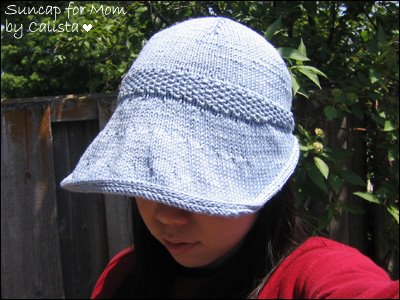
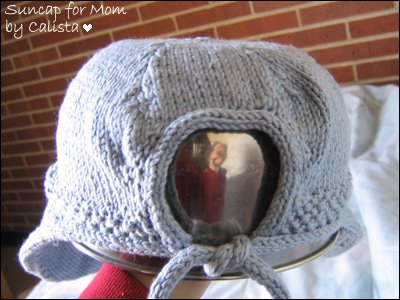
Suncap for mama!


I knitted this for my mom for her volunteer trip every summer.
I modified this pattern from KNoon Designs to adjust to my gauge.
Actually I didn't like how the visor draped, so I frogged it and am knitting it again now.
I used less than 1 skein of cascade sierra. I think it's a good odd ball project.

Saturday, February 04, 2006