Saturday, January 07, 2017

How to Add Half Milano Edging on Knitting Machine

In this posting, I'll switch the gear and talk about a machine knitting stitch.
There was a question on how to knit a half milano stitch on the Facebook machine knitting community, so I'm posting a tutorial on it.

A half milano stitch is consisted of one row of full needle rib and another row of jersey. It can be done across entire rows, but a lot of times it is used to stabilize edges of panels knit in jersey. It is often used along the side edges of scarves or blankets, the center front edges of open front cardigans without plackets, or the opening edges of hoods. I've met a couple people from UK calling this stitch a "semi-double" stitch, but the term "half milano" is more commonly used in the US fashion industry.

Depending on the yarn and the tension, the face side of half milano stitches could almost look like jersey, but the stitches look elongated than jersey on the back side.


OK, here's how you knit it on a machine.
I'm using my Brother standard gauge knitting machine (860 bed + 940 carriage) with a 850 ribber attachment.
**You can click pictures to open them bigger.

Step 1. Cast-on needles in full needle rib setting in half pitch;

Step 2. Knit selvage rows;

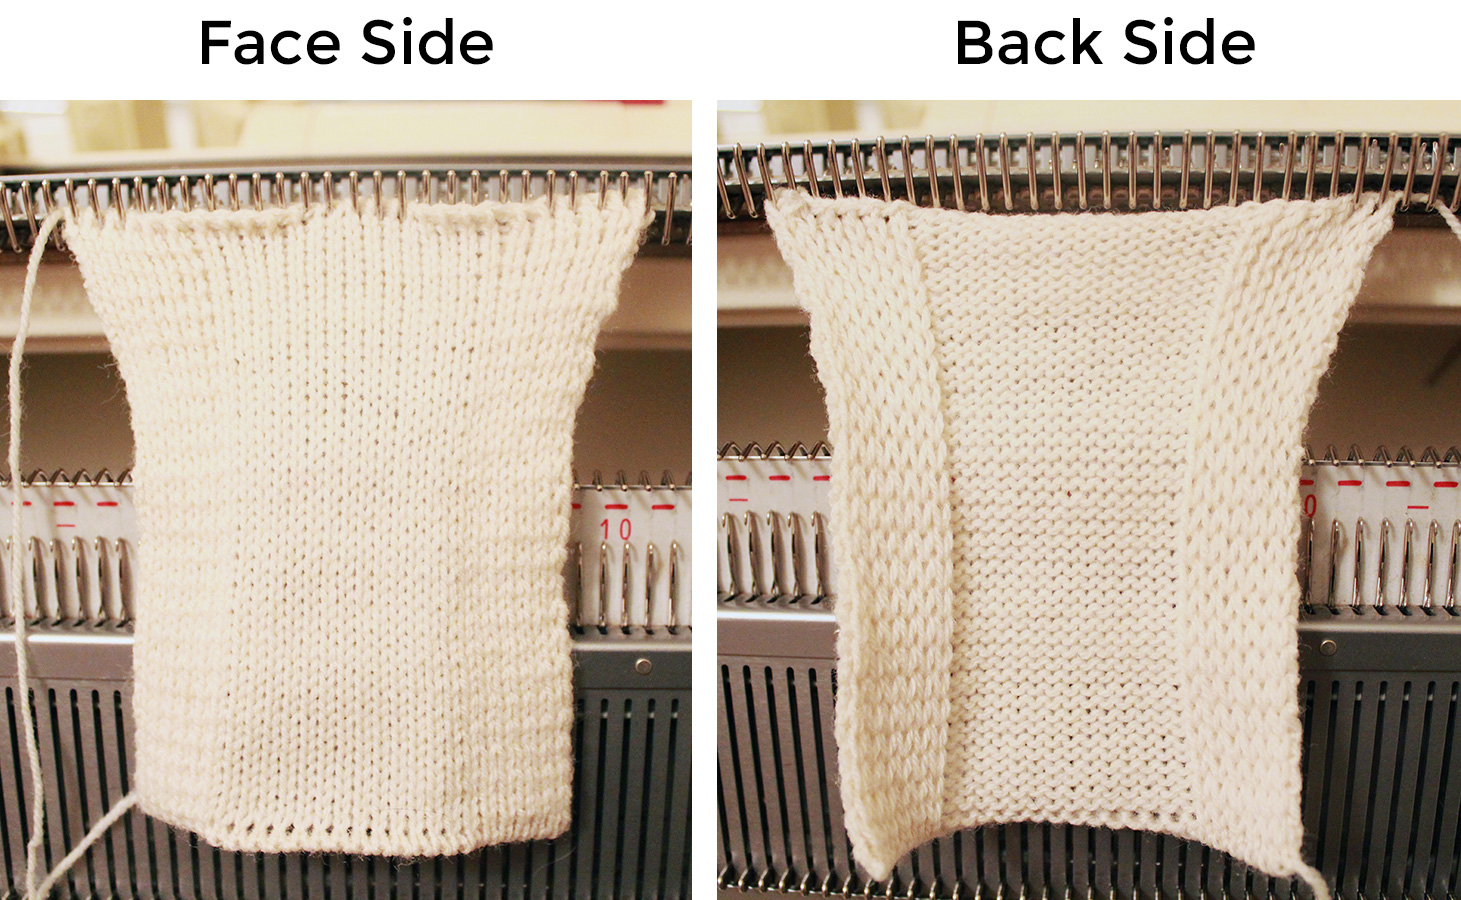
Step 3. Transfer needles from the ribber bed to the main bed for the jersey section. Leave needles that would create half milano edging on the ribber bed;

Step 4. Set the main carriage to knit plain jersey and the ribber carriage to skip when it's moving from left to right by lifting right cam lever. Also set the tension of the ribber bed slightly looser than that of the main bed. (I used fingering weight hand knitting yarn, and set tension to 6 on the main carriage and 8 on the ribber carriage). 


Step 5. Move carriage from right to left to knit a full needle rib row;

Step 6. Move carriage from left to right to knit a jersey row on the main bed and skip needles on the ribber bed;

Step 7. Repeat these two rows until the knitting reaches the length you want. Once you're done knitting, move all stitches from the ribber bed to the main bed to cast-off.

That's it! Happy knitting!

Ashwood, Free Knitting Pattern Published on Knitty Winter '16 Issue


My new(ish) pattern was published on the last winter issue of Knitty last month, and I haven't posted it on my blog for a month now! How time flies especially in December.
I began sketching for this style about this time last year. I initially designed it as a long sleeve tunic at first, but thought it looked more stylish in short sleeves.
There were several people who wished it to be long sleeves, so I'm thinking about making a second one for my sister with long sleeves someday. 

I also initially designed this in Rowan Fazed Tweed, but when I requested yarn support I heard that the yarn may get discontinued soon, so I ended up using Plymouth Tuscan Aire. I'm actually happier that I ended up with Tuscan Aire. Though it's a bulky weight yarn, it's actual gram weight per meter is very light due to it's tubular construction, so the sweater is lighter and airier than other cable sweaters in similar gauge. 

Here are more pictures and link to the pattern page;


Monday, October 03, 2016

Fall is here!

Whoa! It was last fall that I posted my last posting, and another fall is already here. :D
I wanted to share the picture of the fall centerpiece that I created.
I love baby boo pumpkins. They are the cutest pumpkins and instantly create modern but warm Fall ambiances. Happy Fall to you all!


Friday, September 25, 2015

Loftee Pullover...Free Knitting Pattern

I can't believe my last post was written in December 2013. I'm such a sloppy blogger. 
However, this time again I'm back with a free pattern!
I actually made this sweater a few years ago. 
This sweater is easy enough for a beginner to try, but at the same time it's stylish and versatile enough that any knitter would like to knit.
I took notes as I was knitting to make a pattern someday, but my notes got lost in moving.
A few months ago, I finally got around creating the pattern based on the sweater and my memory.


 Since the pattern was written much later without the notes, I've been postponing the post until one of my friends test knit it for me, but all knitting friends have been too busy to test knit it and the weather is getting colder, so I decided to just post it. 
Since it's a simple pattern, let's hope I didn't make any mistakes. :D
Please let me know if you find any error. 

On the pattern, I listed Jaeger Roma and Rowan Kid Silk Haze as the recommended yarns.
However, the sweater in the photo was actually made with 1 end of Jaeger Roma and 1 end of Knit Picks Aloft. The reason why I replaced Knit Picks Aloft with Rowan Kid Silk Haze is because I found Aloft shed like crazy - almost to a point that it was not wearable with other clothes. (Yes, when you need to wear this with some kind of bottoms.) I washed and ran it in the dryer with no heat cycle hoping to remove some of the loose fibers, and I ended up removing a huge ball of fibers as you can see in the picture below. That's why I didn't listed Aloft as the recommended yarn. I tried to estimate the number of balls of Kid Silk Haze as close as possible, but I couldn't calculate the yarn consumption for all sizes yet. 
Moreover, I found that Jaeger Roma has been discontinued. As for a substitute yarn, I would recommend using somewhat fluffy light worsted weight yarn. Though the label claims Roma is DK weight, I think it is thicker and fluffier than other usual DK weight yarns.

Happy knitting!


Sunday, December 22, 2013

Free Knitting Pattern: Lily's Cardigan


Today, I'd like to share a free pattern for a cute baby cardigan.
I made this cardigan and the beanie last spring for my niece, Lily.
I first made a beanie following "Scalloped Lace Baby Cap by Carrie Griffin", and used the same lace pattern to create the cardigan.
As I knit it, I wrote down some notes to share the pattern someday, and almost a year later, here is the pattern! :)

This pattern makes a cardigan measuring 10" at chest on flat (total 20" circumference). I did not grade the pattern to make other sizes yet, but I will soon update the graded pattern. In the meantime, if you want to make it smaller or bigger, you can still do it by simply using lighter or heavier yarns, and smaller or bigger needles.

Download pattern in PDF format 

Yarn: Araucania Ulmo
* I think I used about 1 skein of Ulmo, but I forgot to measure the weight before I mail it. I’ll check the weight if I make the 2nd one.
Needle : 4.5mm circular needle
Gauge: 19sts x 26rows (4”sq in St st), 1 lace repeat: 2 5/8”w x 1 3/4"h
Size: 6~12 month (chest measures 10” flat)

Crest of Wave Chart


Body
CO 109 sts. Knit 1 row.
Follow the “Crest of Wave” chart total 3 times. (total 36 rows)
K1, *k2tog, k5; rep from * to last 3 sts, k2tog, k1. -93sts rem.

Underarm
Row 1: P20, bind of 5sts, p43, bind off 5sts, P20 – 83 sts rem.
Row2: K20, pm cast on 26sts, pm, k 43, pm, cast on 26sts, pm, k20 – 135sts rem.
Row3: *P to next marker, move marker, k to next marker, move marker; rep from * once more, p to end of row.
Row4: *K to 2sts before next marker, k2tog, move marker, k1, k2tog, k to 3sts before next marker, k2tog, k1, move marker, k2tog; rep from * once more, k to end of row – 127 sts rem.
Row 5 & 6: Rep row3 & 4 – 119sts rem.
Row 7: P all sts.
Row 8: *K to 2sts before next marker, k2tog, move marker, k1, k2tog, k to 3sts before next marker, k2tog, k1, move marker, k2tog; rep from * once more, k to end of row – 111sts rem.
Row 9~22: Rep row7 - 8 seven more times – 55 sts rem.
Row 23: K 1 row.
Row 24: Rep row 8 – 47 sts rem.
Knit 2 rows.
BO all sts.

Wearer’s Right Side Placket
Pick up 46 stitches from wearer’s right side CF Edge.
(WS) Sl1, k to end of row.
(RS) Sl1, k to last 18 sts, * yo, k2tog, k5; rep from * once more, yo, k2tog, k2.
Next 2 rows: Sl1, k to end of row.
BO all sts.

Wearer’s Left Side Placket
Pick up 46 stitches from wearer’s right side CF Edge.
K 5 rows.
BO all sts.

Finishing
Weave in ends, and sew buttons on.


* Please use this pattern for personal / non-profit use only. You may use this pattern for charity knitting or to make projects for charity fundraising. Please do not post this pattern anywhere else without permission. Thanks.*

Saturday, December 07, 2013

Lill

Finally, a new pattern has arrived!
As shown in the previous preview post, it is an Estonian lace inspired tunic, knitted from top to bottom.

The name of the sweater is "Lill" which means a flower in Estonian.
If you look into the body carefully, you will see a flower blossoming. :)
The pattern is a mix of written instructions and charts.
You can get the pattern on my Ravelry page or my Etsy store.

* Click below to buy from my Ravelry store


* See projects made from this pattern


Friday, November 15, 2013

A New Pattern on Its Way...

Hi there!

What a diligent blogger I am, writing a post first time in three years! :P
Finally, there is a new pattern coming on its way.
Actually, I made this sweater about a year and half ago, but couldn't get around to take photos and edit the patterns for such a long time.
I'm excited to share my new design, "Lill". It's an Estonian lace tunic.
The first round of the photos did not show the details of the stitches very well, so I'm going to take a few more pictures over this weekend.
Here are some preview photos...


Tuesday, August 17, 2010

Finally! Forest Cardi Pattern is Completed! :D


Wow, it feels like forever since I started re-editing it. There has been so many interferences and delays. My husband even tease me saying that that pattern was like a never-ending story.
BUT!! through it all, it's finally done and released on Ravelry!.

Through this editing process, I thought myself Adobe InDesign program and it was worth investing the time. The pattern edited with InDesign looks so much more professional, and the printed charts are so much clearer.