
Finally! I’ve finished the tutorial for this purse~!
As I warned earlier, it’s rather a tutorial showing how to make your own pattern than a pattern itself.
I’m not sure if this tutorial makes sense to other people.
I have some experience making knitting patterns, but never made a crochet pattern before.
Anyway, here it goes~!
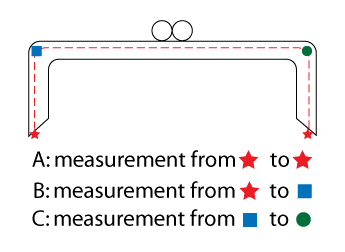
STEP1. Measure the frame you have.

STEP2. Decide how full you want your purse to be. (FYI: mine was the 2nd option)
Draw the outline on a piece of paper and measure the width.

STEP3. Choose a bottom shape. (mine was ellipse.)
Then crochet the bottom part to make the circumference of the bottom to be same as twice of the width from STEP2.
If you don’t know how to crochet an ellipse shape, you can refer to the sole part of this pattern -> http://megan.kiwi.gen.nz/Bootee/instructionsUS.html
(I used SC stitches)

STEP 4. When the bottom reaches the size you need, keep crocheting straight up as below;
ROUND 1: ch2, hdc all around.
ROUND 2:
ch3, 6 dc only through the front loop of the first hdc of previous row, *7dc only through the front loop of the next hdc of previous row* rep from *to* all around the row.
Then, ch2, hdc only through the back loop of the hdc of row 1.
Rep the ROUND 2 until it reaches the height you want.
STEP 5. Crochet to make the top shape decided at STEP 2.
If you chose option1, you can simply add couple more rows of SC.
If you chose option2, crochet front and back side separately, decreasing both edges to make the shape you want.
If you chase option3, crochet front and back side separately, while keeping the edge straight up.
STEP 6. Sew the crocheted purse on the frame if your frame has holes. Otherwise, glue the purse in the ridge of the frame.
Tada~You have a small wriggly purse!
* Please do not post this tutorial anywhere else without permission. Thanks.*


