

Showing posts with label crochet. Show all posts

Saturday, July 18, 2009

Bullion stitch cushion..FO


I love it! Finally, I can sit comfortably on my wooden chair.
Now the problem is that it's too cute to sit on . :D

Bullion cushion..adding back side


This poor little thing was sitting in my UFO box for an year and half.

I actually don't own the pattern book, but I memorized only the front, standing at a bookstore when I was visiting Tokyo, because it was a very simple pattern. I didn't know how they finished the back on the book.

The reason why it has been an UFO for so long even though the front was all done is that I was disappointed how the front part turned out. Each bullion was not popping out like the one one the picture of the book, rather it was so flat. Also I couldn't make the sts between the bullions tight like the one in the picture. So I tossed the UFO in the box and forgot about it for long.

Then it showed up when I was organizing my yarn stash couple of weeks ago.
Yesterday, I was looking at the UFO, an idea suddenly came up in my head that adding back made of sc and dc might solve all the issues.

I tested on one bullion. That was right! It was not the pattern's fault! It was mine! Adding the back made the bullions pop out and the gap between each bullion became tight as the FO in the picture!

I was so excited and finished up in a few hours!

Here are some progress shots of how I finished up the back
I simply replaced the coil sts of the front with DC (TC in British crochet terms), and I picked the sts on the edge of the front side as I DC around.


I love how it pops out after adding the back.
If you compare the front two which have back and the ones behind without back, you will see the difference.


Friday, August 17, 2007

TUTORIAL OF CROCHETED COIN PURSE


As seen on Cut Out + Keep

Finally! I’ve fini­shed the tutorial for this purse~!
As I warned earlier, it’s rather a tutorial showing how to make your own pattern than a pattern itself.
I’m not sure if this tutorial makes sense to other people.
I have some experience making knitting patterns, but never made a crochet pattern before.
Anyway, here it goes~!

STEP1. Measure the frame you have.
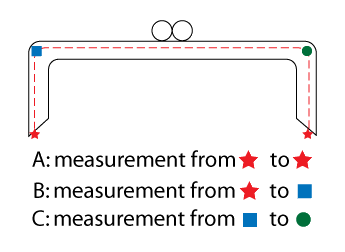


STEP2. Decide how full you want your purse to be. (FYI: mine was the 2nd option)
Draw the outline on a piece of paper and measure the width.


STEP3. Choose a bottom shape. (mine was ellipse.)
Then crochet the bottom part to make the circumference of the bottom to be same as twice of the width from STEP2.
If you don’t know how to crochet an ellipse shape, you can refer to the sole part of this pattern -> http://megan.kiwi.gen.nz/Bootee/instructionsUS.html
(I used SC stitches)
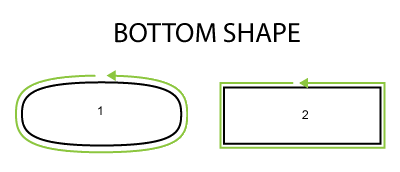

STEP 4. When the bottom reaches the size you need, keep crocheting straight up as below;
ROUND 1: ch2, hdc all around.
ROUND 2:
ch3, 6 dc only through the front loop of the first hdc of previous row, *7dc only through the front loop of the next hdc of previous row* rep from *to* all around the row.
Then, ch2, hdc only through the back loop of the hdc of row 1.
Rep the ROUND 2 until it reaches the height you want.

STEP 5. Crochet to make the top shape decided at STEP 2.
If you chose option1, you can simply add couple more rows of SC.
If you chose option2, crochet front and back side separately, decreasing both edges to make the shape you want.
If you chase option3, crochet front and back side separately, while keeping the edge straight up.

STEP 6. Sew the crocheted purse on the frame if your frame has holes. Otherwise, glue the purse in the ridge of the frame.
Tada~You have a small wriggly purse!


* Please do not post this tutorial anywhere else without permission. Thanks.*